
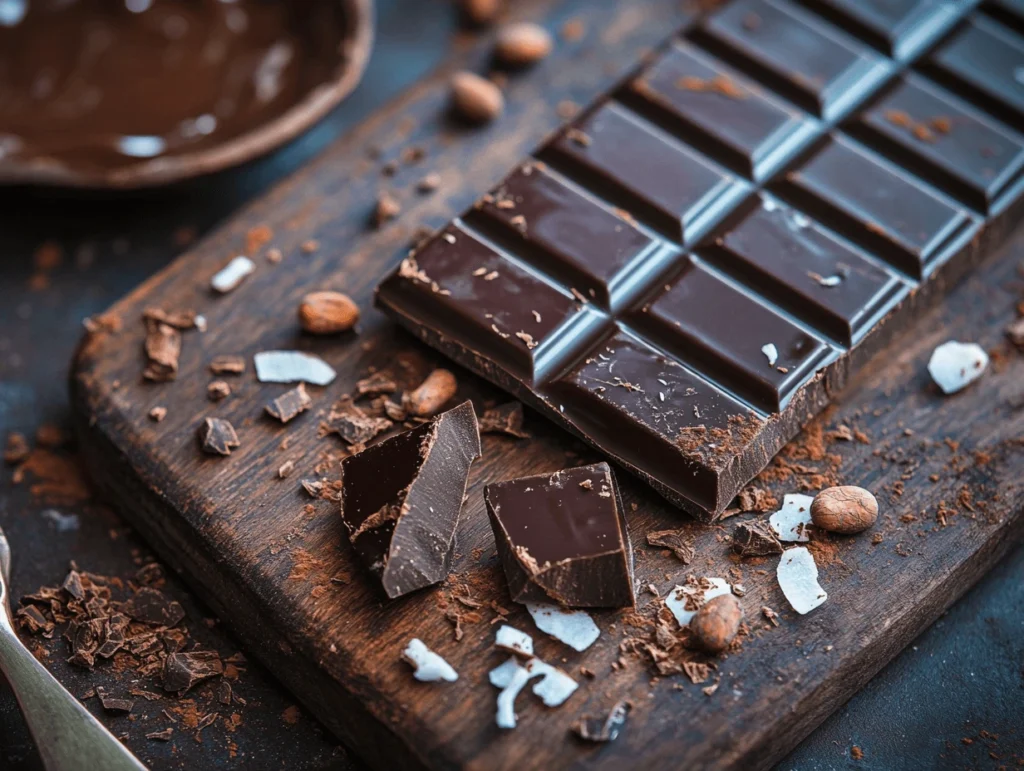
Who doesn’t love chocolate? Rich, indulgent, and oh-so-satisfying, it’s a treat that many simply can’t resist. However, what if you could enjoy all the decadence while avoiding dairy, refined sugars, and artificial additives? Fortunately, this vegan chocolate recipe allows you to do just that!
In fact, making homemade vegan chocolate is easier than you might think. With just a few simple plant-based ingredients—such as cocoa powder, coconut oil, and natural sweeteners—you can create a smooth, creamy, and delicious chocolate that melts in your mouth. Whether you’re looking for a dairy-free alternative, a healthier option, or even a fun way to customize your favorite treat, this recipe is exactly what you need.
In this guide, we’ll show you exactly how to make the perfect vegan chocolate at home, with step-by-step instructions, ingredient swaps, and creative variations. Get ready to indulge in pure, guilt-free chocolate goodness! 🍫✨
Why Choose a Vegan Chocolate Recipe?
Choosing vegan chocolate isn’t just about avoiding dairy—it’s also a more sustainable and ethical choice. According to Chocolats Frigoulette, vegan chocolate helps reduce carbon emissions linked to dairy production and supports cruelty-free alternatives.
Dairy-Free & Health Benefits: No dairy, no artificial additives.
Choosing a vegan chocolate recipe isn’t just about avoiding dairy—it’s about embracing a healthier, more natural way to enjoy chocolate. Traditional milk chocolate often contains dairy, refined sugars, and artificial additives, which can lead to digestive issues, inflammation, and even allergies for some individuals. Moreover, by making your own dairy-free chocolate, you can enjoy all the indulgence while also reaping incredible health benefits.
1. Easier Digestion & Allergy-Friendly
Dairy products can be difficult for many people to digest, especially those who are lactose intolerant or have a dairy allergy. Even for those without allergies, dairy can sometimes cause bloating, gas, or discomfort. Vegan chocolate eliminates these issues, making it a perfect option for anyone seeking a gut-friendly alternative.
2. Rich in Antioxidants
Dark chocolate is naturally high in flavonoids and polyphenols, powerful antioxidants that help fight inflammation, reduce oxidative stress, and improve heart health. Cacao powder and dark chocolate (70% or higher) have been linked to:
- Lower blood pressure
- Improved blood circulation
- Reduced risk of heart disease
When you make homemade vegan chocolate, you control the ingredients and can use pure cacao powder, which retains even more antioxidants than processed cocoa powder.
3. No Artificial Additives or Preservatives
Store-bought chocolates often contain artificial flavors, emulsifiers (like soy lecithin), and preservatives to extend shelf life. These unnecessary ingredients can sometimes trigger sensitivities or negatively impact gut health. Homemade vegan chocolate is made with simple, real food ingredients like cacao, coconut oil, and natural sweeteners, keeping it pure and wholesome.
4. Healthier Fats for Sustained Energy
Instead of relying on milk fats, vegan chocolate gets its smooth texture from healthy plant-based fats like coconut oil, cacao butter, or nut butters. These fats are:
- Easier to digest compared to dairy-based fats
- Rich in medium-chain triglycerides (MCTs) from coconut oil, which provide quick energy
- Heart-healthy, as they help reduce bad cholesterol levels
5. Naturally Sweetened & Lower in Processed Sugar
Most commercial chocolates are loaded with refined sugars, which can spike blood sugar levels and lead to energy crashes. With homemade vegan chocolate, you can use natural sweeteners like:
- Maple syrup (rich in antioxidants and minerals)
- Dates (fiber-rich and naturally sweet)
- Coconut sugar (lower glycemic index)
These alternatives help create a guilt-free, naturally sweetened chocolate that’s better for overall health.
Rich & Indulgent Taste: Made with Natural Ingredients like Cacao and Coconut Oil
One of the biggest misconceptions about vegan chocolate is that it lacks the rich, creamy, and indulgent taste of traditional milk chocolate. However, with the right combination of high-quality plant-based ingredients, you can create a deeply satisfying, velvety-smooth chocolate that rivals any store-bought option.
Let’s explore how ingredients like cacao and coconut oil contribute to the luxurious texture and bold flavor of homemade vegan chocolate.
1. Cacao: The Secret to Deep, Chocolatey Flavor
At the heart of any good chocolate recipe is cacao—the purest form of chocolate. Unlike heavily processed cocoa powder, raw cacao powder is packed with natural flavors, antioxidants, and nutrients, giving your vegan chocolate an intense, deep, and slightly fruity chocolate taste.
Why Use Cacao Instead of Cocoa Powder?
- More intense chocolate flavor – Cacao retains the bold, slightly bitter taste of natural chocolate, making it richer.
- Higher in nutrients & antioxidants – Less processing means it keeps more of its health benefits.
- No need for dairy – The natural fats in cacao help create a creamy texture without the need for milk.
If you prefer a milder flavor, you can opt for Dutch-processed cocoa powder, which has a smoother and less acidic taste.
2. Coconut Oil: The Key to a Silky, Melt-in-Your-Mouth Texture
Unlike dairy-based chocolates, which rely on milk fats and butter for creaminess, vegan chocolate offers a plant-based alternative. In this case, coconut oil acts as the perfect substitute. When combined with cacao powder and a natural sweetener, it creates a luscious, melt-in-your-mouth consistency that makes homemade vegan chocolate exceptionally smooth and satisfying.
Why Coconut Oil is the Perfect Ingredient for Vegan Chocolate
- Gives a creamy, silky texture – Coconut oil solidifies at room temperature, helping chocolate hold its shape while remaining soft and smooth when eaten.
- Enhances the richness – The mild coconut flavor adds a subtle sweetness that complements the deep cacao notes.
- Boosts nutrition – Contains healthy fats (medium-chain triglycerides – MCTs) that provide a quick energy source.
💡 Tip: For an even firmer chocolate that holds its shape better at room temperature, consider replacing some or all of the coconut oil with cacao butter. Since it has a higher melting point, it helps create a more stable texture while also providing an ultra-smooth finish.
3. Natural Sweeteners That Enhance Flavor Without Overpowering
Unlike commercial chocolates that rely on refined white sugar, homemade vegan chocolate uses natural sweeteners. Not only do they add sweetness, but they also enhance the depth of the chocolate flavor, making each bite more satisfying.
Some of the best natural sweeteners for a rich, indulgent vegan chocolate include:
- Maple syrup – Adds a mild caramel-like sweetness and blends well with cacao.
- Coconut sugar – Low glycemic index, with a hint of molasses flavor.
- Date syrup or blended dates – Natural fiber-rich sweetness that complements cacao’s richness.
- Agave nectar – A mild, neutral sweetener that maintains the smooth texture.
Using these natural sweeteners ensures that your vegan chocolate is not only rich in taste but also free from refined sugars and artificial additives.
4. Optional Additions to Elevate Your Vegan Chocolate Experience
To take your vegan chocolate to the next level, try incorporating these flavor-enhancing ingredients:
- Vanilla extract – Adds a hint of warmth and rounds out the bitterness of cacao.
- Pinch of sea salt – Balances the sweetness and intensifies the chocolate flavor.
- Almond or hazelnut butter – Creates a nutty, creamy consistency.
- Espresso powder – Enhances the depth of the chocolate taste for a more gourmet experience.
💡 Pro Tip: If you love classic milk chocolate, try blending your chocolate with oat milk powder or almond flour to create a smoother, lighter version.
Perfect for Dietary Needs: Gluten-Free, Refined Sugar-Free, and Customizable
One of the biggest advantages of making your own vegan chocolate at home is that you can tailor it to fit various dietary needs and preferences. Unlike many store-bought chocolates filled with gluten, dairy, refined sugar, and artificial additives, this homemade vegan chocolate is not only naturally gluten-free and refined sugar-free but also highly customizable to suit your taste.
Whether you have food allergies, follow a specific diet, or simply prefer clean ingredients, this recipe ensures that everyone can enjoy a delicious and healthy chocolate treat!
1. 100% Gluten-Free – Safe for Gluten Intolerance & Celiac Disease
Many commercial chocolates, especially flavored or filled varieties, may contain hidden gluten due to additives, thickeners, or cross-contamination during manufacturing. For individuals with gluten intolerance or celiac disease, consuming even small traces of gluten can cause digestive discomfort or serious health issues.
With homemade vegan chocolate, you eliminate the risk by using pure, naturally gluten-free ingredients, such as:
To make high-quality vegan chocolate, you need a strong foundation of wholesome ingredients. Three key components play a crucial role:
- Cacao powder or raw cacao is naturally gluten-free and packed with antioxidants, making it the perfect base.
- Coconut oil or cacao butter provide the healthy fats necessary for a smooth, creamy texture.
- Natural sweeteners like maple syrup, coconut sugar, dates, or agave add just the right amount of sweetness, without refined sugars or gluten-based fillers.
💡 Tip: If you’re adding mix-ins like nuts, dried fruit, or flavorings, always check labels to ensure they’re gluten-free!
2. Refined Sugar-Free – Naturally Sweetened for a Healthier Indulgence
Most store-bought chocolates are loaded with refined white sugar, which can lead to blood sugar spikes, energy crashes, and inflammation. By making your own vegan chocolate, you control the sweetness level and can choose healthier, natural sweeteners that offer additional nutrients and a lower glycemic index.
Best Natural Sweeteners for Vegan Chocolate:
🍁 Maple syrup – Adds a mild caramel-like sweetness and is rich in minerals.
🥥 Coconut sugar – Has a subtle molasses flavor and a lower glycemic impact.
🌿 Date syrup or blended dates – Fiber-rich and naturally sweet with a slight caramel taste.
🌵 Agave nectar – A neutral, liquid sweetener that blends well into chocolate.
🍌 Mashed ripe bananas – A creative way to add natural sweetness and a soft texture.
These natural alternatives ensure that your chocolate is healthier, more nutritious, and free from unnecessary processed sugars.
💡 Tip: If you prefer sugar-free chocolate, you can use stevia, monk fruit sweetener, or erythritol for a low-carb, keto-friendly version!
3. Fully Customizable – Create Your Perfect Chocolate
One of the best things about homemade vegan chocolate is that you can personalize it to match your taste and dietary needs. Whether you love crunchy, nutty, spicy, or fruity flavors, there are endless possibilities to create your own signature chocolate recipe.
Fun Ways to Customize Your Vegan Chocolate:
🔥 Spicy Kick – Add a pinch of cayenne or chili powder for a Mexican-inspired chocolate.
🍊 Citrus Zest – Grate some orange or lemon zest into the mix for a fresh twist.
🌰 Nutty Delight – Stir in chopped almonds, walnuts, or hazelnuts for crunch.
🥥 Coconut Bliss – Sprinkle shredded coconut for a tropical touch.
🍓 Fruity Fusion – Add freeze-dried strawberries, raspberries, or banana chips.
🍵 Matcha Boost – Mix in matcha powder for an antioxidant-rich green tea chocolate.
🍫 Extra Creamy – Blend in almond butter, peanut butter, or tahini for a smooth, fudgy texture.
With so many variations, you can make a batch of personalized, delicious, and healthy chocolate every time!
Essential Ingredients for Homemade Vegan Chocolate
Cocoa Powder vs. Cacao Powder: What’s the Difference?
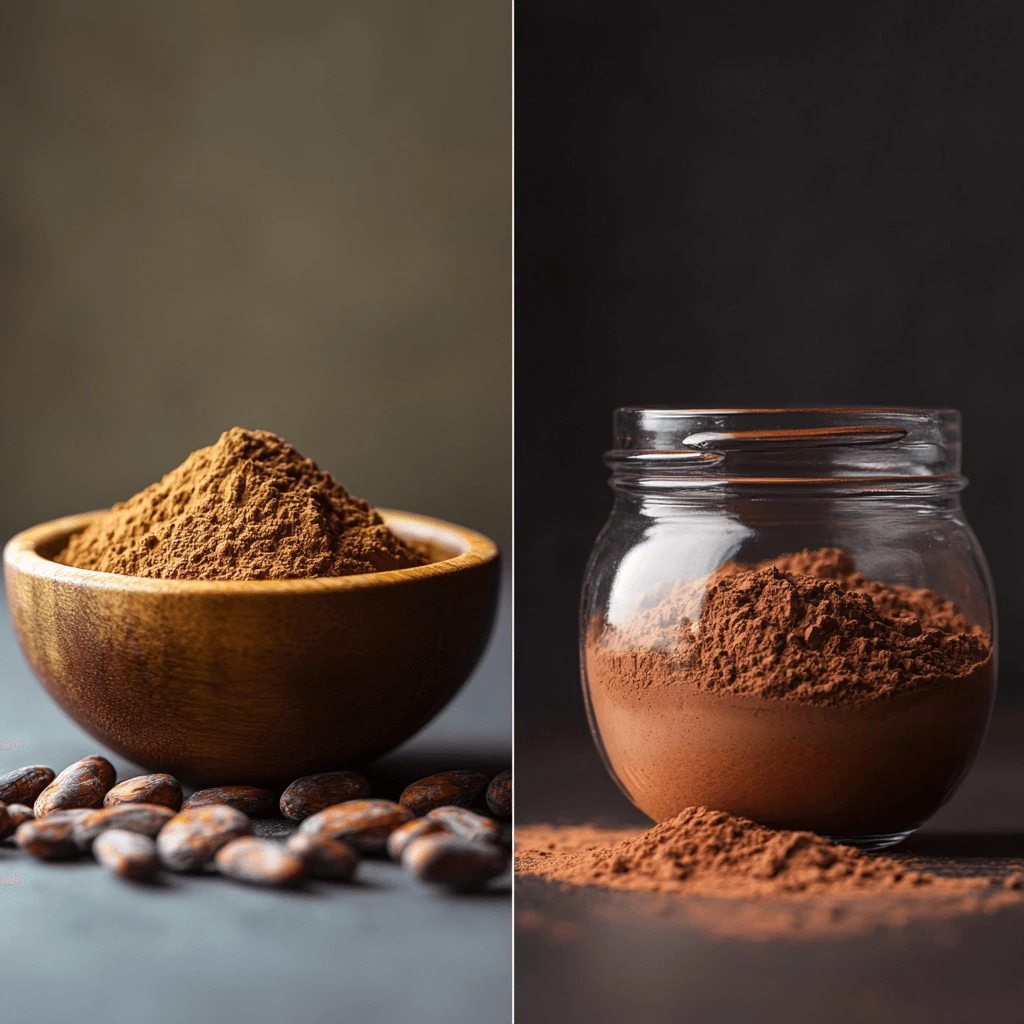
When making vegan chocolate, one of the most important ingredients is the chocolate base, which often comes in the form of either cocoa powder or cacao powder. Although these two may seem interchangeable, there are key differences in how they are processed, their nutritional content, and their impact on the final taste and texture of your chocolate.
By understanding the differences between cacao and cocoa powder, you can make an informed choice about which option is best for your recipe. Whether you’re aiming for maximum flavor, health benefits, or a specific texture, knowing these distinctions will help you achieve the perfect result.
1. What is Cacao Powder? (The Raw, Nutrient-Dense Option)
Cacao powder is the least processed form of chocolate powder. It comes from cold-pressed raw cacao beans, which helps retain most of the natural enzymes, antioxidants, and nutrients found in the cacao bean.
Characteristics of Cacao Powder:
Cacao powder is valued for its raw, nutrient-dense nature, making it a favorite among health-conscious chocolate lovers. Unlike processed cocoa powder, it:
- Retains its natural properties due to minimal processing.
- Boasts a high antioxidant content, including flavonoids, magnesium, iron, and fiber.
- Has a bold, intense flavor, with a slight acidity and deep chocolate taste.
- Contains natural fats, contributing to a richer and smoother texture.
Best Uses for Cacao Powder in Vegan Chocolate:
- Ideal for health-conscious recipes due to its high nutritional value.
- Works well in raw vegan chocolate recipes since it retains natural enzymes.
- Great for bitter, dark chocolate lovers who enjoy a deep, rich taste.
💡 Tip: Cacao powder is best suited for no-bake recipes since heat can destroy some of its nutrients.
2. What is Cocoa Powder? (Processed & Mellow Flavor)
Cocoa powder is made by roasting cacao beans at high temperatures before grinding them into a fine powder. This reduces the natural bitterness of cacao and results in a milder, more familiar chocolate flavor. However, the heating process also lowers the number of antioxidants and nutrients in the final product.
Characteristics of Cocoa Powder:
Cocoa powder goes through a roasting process that alters its chemical composition, affecting both flavor and nutrient content. Here’s how it differs from raw cacao powder:
- Roasting reduces acidity, resulting in a smoother and milder taste.
- It becomes sweeter and less intense, making it ideal for desserts.
- Some antioxidants and enzymes are lost due to heat exposure.
- There are two types: Natural cocoa powder, which retains some acidity, and Dutch-processed cocoa, which is alkalized for a darker color and smoother taste.
Two Types of Cocoa Powder:
- Natural Cocoa Powder – Has a slightly bitter taste, lighter color, and is acidic.
- Dutch-Processed Cocoa Powder – Treated with alkali to neutralize acidity, giving it a smoother, darker, and richer taste.
Best Uses for Cocoa Powder in Vegan Chocolate:
- Works well in baked goods (brownies, cakes, cookies).
- Perfect for sweet, creamy vegan chocolate recipes.
- Ideal for mild chocolate flavors without strong bitterness.
💡 Tip: If using Dutch-processed cocoa powder, keep in mind that it may require baking powder instead of baking soda due to its neutral pH level.
3. Which One Should You Use for Vegan Chocolate?
The choice between cacao powder and cocoa powder depends on what you prioritize:
| Factor | Cacao Powder | Cocoa Powder |
|---|---|---|
| Processing | Raw, minimally processed | Roasted at high temperatures |
| Nutritional Value | High in antioxidants, minerals, fiber | Lower due to heat processing |
| Flavor | Strong, slightly bitter, deep chocolate taste | Milder, smoother, and sweeter |
| Best For | Raw chocolates, smoothies, superfood recipes | Baked goods, classic chocolate treats |
For a nutrient-dense, raw, and intense chocolate, go for cacao powder. If you prefer a milder, more traditional chocolate taste, cocoa powder is the better choice.
💡 Pro Tip: If you want the best of both worlds, try mixing cacao and cocoa powder to balance richness, health benefits, and sweetness in your homemade vegan chocolate!
Sweetener Choices: Maple Syrup, Dates, or Coconut Sugar?
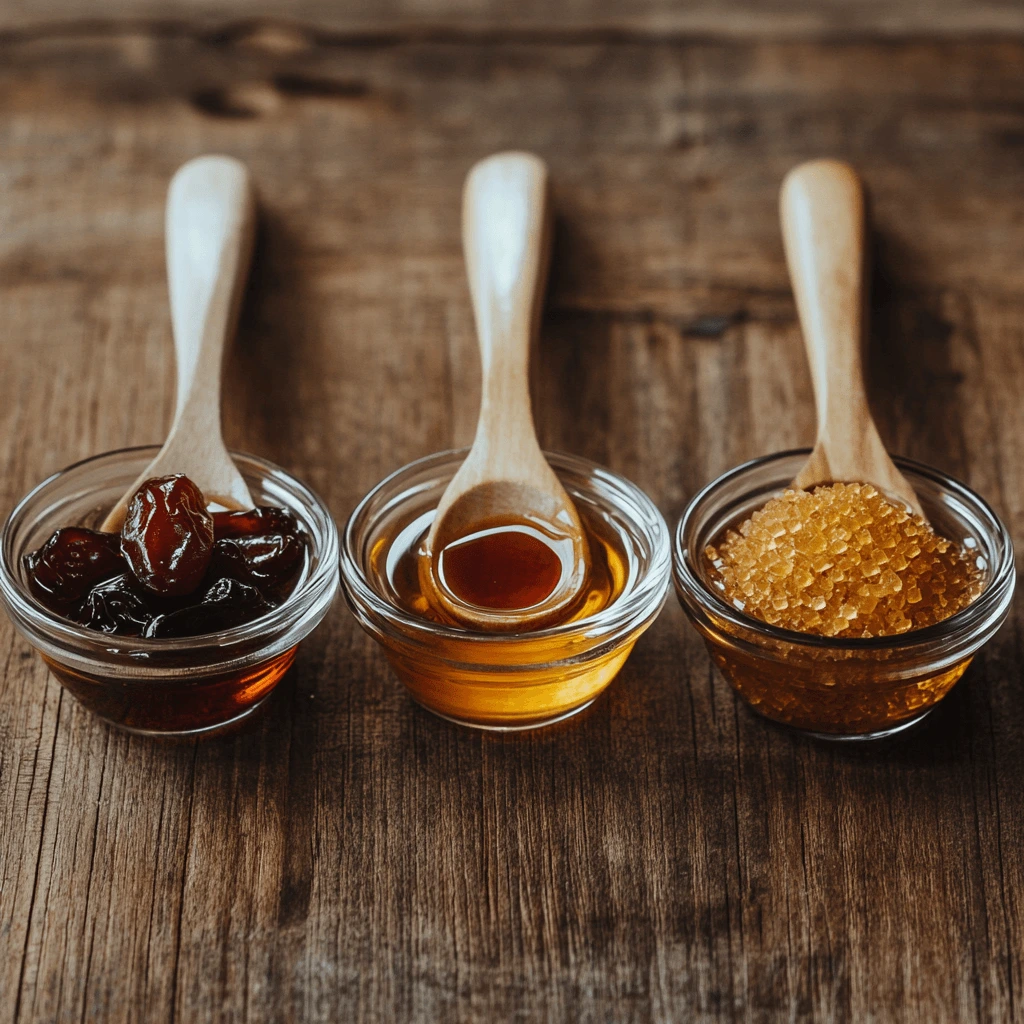
One of the best things about making vegan chocolate at home is the ability to control the sweetness level and type of sweetener used. Many store-bought chocolates are loaded with refined white sugar, which can cause blood sugar spikes, energy crashes, and inflammation. Instead, using natural sweeteners like maple syrup, dates, or coconut sugar not only enhances the flavor but also provides additional nutrients and a lower glycemic index.
Let’s explore these three popular natural sweeteners, their benefits, and how they affect the texture and taste of homemade vegan chocolate.
1. Maple Syrup – Smooth, Liquid Sweetener with a Rich Flavor
🌿 What is it?
Maple syrup is a natural liquid sweetener derived from the sap of maple trees. It is minimally processed and retains beneficial minerals like manganese and zinc.
✅ Mild caramel-like sweetness that pairs well with chocolate.
✅ Easier to mix into melted cacao butter or coconut oil due to its liquid form.
✅ Lower glycemic index (GI 54) than refined sugar, leading to slower blood sugar spikes.
✅ Rich in antioxidants and trace minerals, offering some health benefits.
💡 Best For:
- Silky, smooth vegan chocolate bars
- Truffles and chocolate sauces
- Healthier sweetening alternative in baked goods
⚠️ Consideration: Since maple syrup is a liquid sweetener, it may slightly soften the texture of chocolate, making it less firm compared to chocolates made with dry sweeteners.
2. Dates – Whole-Food Sweetener Packed with Fiber & Nutrients
🌿 What is it?
Dates are naturally sweet, fiber-rich fruits that have been used for centuries as a wholesome alternative to sugar. They can be blended into a paste or chopped into small pieces and mixed into chocolate for added texture.
✅ Whole-food sweetener – Contains fiber, vitamins, and minerals.
✅ Rich, caramel-like taste – Enhances the depth of chocolate flavors.
✅ Low glycemic impact (GI 42), thanks to fiber that slows sugar absorption.
✅ Natural binding agent – Great for no-bake chocolate treats.
💡 Best For:
- Raw vegan chocolate bars
- Chocolate energy bites or fudge
- Chocolates with added texture (chopped dates as mix-ins)
⚠️ Consideration: Since dates are not fully water-soluble, they may result in a slightly grainier texture when blended into chocolate. Using date syrup or finely blending date paste can help create a smoother consistency.
3. Coconut Sugar – A Granulated Alternative for Traditional Chocolate Texture
🌿 What is it?
Coconut sugar is a natural, granulated sweetener made from the sap of coconut palm flowers. It has a mild caramel-like flavor, similar to brown sugar, and is often used as a one-to-one substitute for regular sugar.
✅ Dry, granulated form – Keeps the chocolate firm and crisp.
✅ Rich in minerals like potassium, zinc, and iron.
✅ Lower glycemic index (GI 35) than refined sugar.
✅ More sustainable than cane sugar, as coconut palms require fewer resources to produce sugar.
💡 Best For:
- Firm, snappable chocolate bars
- Chocolate coatings and confections
- Baking applications where dry sweeteners are needed
⚠️ Consideration: Since coconut sugar is granulated, it does not dissolve easily in fats like cacao butter. To achieve a smooth texture, it should be blended into a fine powder before use or dissolved in a small amount of liquid before adding to chocolate.
4. Which Sweetener is Best for Your Vegan Chocolate?
Choosing the right sweetener depends on your desired chocolate texture, sweetness level, and nutritional preferences.
| Factor | Maple Syrup | Dates | Coconut Sugar |
|---|---|---|---|
| Form | Liquid | Whole food or paste | Granulated |
| Sweetness Level | Moderate, caramel-like | Naturally sweet, rich | Mild, brown sugar-like |
| Glycemic Index (GI) | ~54 (lower than refined sugar) | ~42 (due to fiber content) | ~35 (slowest sugar absorption) |
| Texture Effect on Chocolate | Softer chocolate, smooth | Grainy if not blended well | Crisp and firm |
| Best For | Truffles, sauces, smooth chocolate | Energy bites, raw chocolate, textured chocolates | Chocolate bars, baking, firm chocolates |
💡 Pro Tip: Blending two or more sweeteners (e.g., maple syrup + coconut sugar) can balance sweetness, texture, and flavor, resulting in the perfect homemade vegan chocolate!
Healthy Fats: Coconut Oil, Cocoa Butter, or Nut Butter?
When making vegan chocolate, the choice of fat plays a crucial role in determining the texture, flavor, and consistency of your final product. While traditional chocolate contains cocoa butter, when making homemade vegan chocolate, you have several plant-based fat options to choose from, including coconut oil, cocoa butter, and nut butters. Each of these options brings a unique texture and taste. Therefore, understanding their differences can help you create the perfect chocolate for your needs—whether you prefer a firm chocolate bar, creamy truffles, or a spreadable chocolate treat.
Let’s break down these three popular healthy fats and explore how they impact your vegan chocolate.
1. Coconut Oil – Smooth, Light, and Quick-Melting
🌿 What is it?
Coconut oil is a plant-based, saturated fat derived from coconut flesh. It is often used in no-bake desserts and raw chocolates because of its ability to solidify at cooler temperatures and melt smoothly in the mouth.
✅ Light, mild coconut flavor (unless using refined coconut oil, which is neutral).
✅ Helps chocolate solidify quickly when chilled.
✅ Melt-in-your-mouth texture, making chocolates softer and creamier.
✅ Rich in medium-chain triglycerides (MCTs), which provide quick energy.
✅ Great for raw, no-bake vegan chocolate recipes.
💡 Best For:
- Silky, melt-in-your-mouth vegan chocolate bars
- Chocolate-covered fruits, truffles, or fudge
- No-bake chocolate desserts or chocolate spreads
⚠️ Consideration:
- Coconut oil melts at around 76°F (24°C), meaning chocolates made with coconut oil melt easily at room temperature.
- Best stored in the refrigerator or freezer to maintain firmness.
- If you want to avoid a coconut taste, use refined coconut oil, which is neutral in flavor.
2. Cocoa Butter – The Classic Chocolate Base
🌿 What is it?
Cocoa butter is the natural fat extracted from cacao beans and is the traditional fat used in high-quality chocolate production. It is responsible for the firm, snappable texture of chocolate bars and contributes to rich mouthfeel and longevity.
✅ Neutral chocolate-like aroma and taste (enhances chocolate flavor naturally).
✅ Creates firm, snappable chocolate bars.
✅ Melts at body temperature, giving that luxurious, smooth feel in the mouth.
✅ Stable at room temperature, making it ideal for chocolate bars and baking.
✅ Rich in antioxidants and healthy fats, offering some anti-inflammatory benefits.
💡 Best For:
- Traditional, firm chocolate bars with a professional texture
- Vegan white or dark chocolate recipes
- Chocolates that need to remain stable at room temperature
⚠️ Consideration:
- Cocoa butter is more expensive than coconut oil or nut butter.
- It requires tempering (a controlled melting and cooling process) for a glossy finish and firm texture.
- Takes longer to solidify compared to coconut oil.
3. Nut Butter – Creamy, Rich, and Flavorful
🌿 What is it?
Nut butters like almond, cashew, or peanut butter are excellent additions to vegan chocolate for those who prefer a creamy, soft texture with added flavor. Unlike coconut oil and cocoa butter, nut butters add protein, fiber, and natural sweetness, making them a great nutrient-dense alternative.
✅ Adds richness, creaminess, and depth to chocolate.
✅ Provides plant-based protein and fiber for a more filling treat.
✅ Great for softer, spreadable chocolates like truffles or chocolate spreads.
✅ Pairs well with other ingredients like dates and maple syrup for a balanced taste.
💡 Best For:
- Chocolate nut butter spreads or truffles
- Soft chocolate fudge or energy bites
- Layered chocolates with creamy textures
⚠️ Consideration:
- Chocolate made with nut butter tends to be softer and less firm.
- Best stored in the fridge to prevent oil separation.
- Choose unsweetened nut butter to control the overall sweetness of your chocolate.
4. Which Healthy Fat is Best for Vegan Chocolate?
Each fat brings different qualities to your vegan chocolate, so your choice depends on texture, firmness, and storage preferences.
| Factor | Coconut Oil | Cocoa Butter | Nut Butter |
|---|---|---|---|
| Texture | Soft, creamy, and smooth | Firm, snappable, and glossy | Rich, dense, and creamy |
| Melting Point | Low (melts at 76°F/24°C) | High (melts at 93-97°F/34-36°C) | Soft at room temperature |
| Flavor | Light coconut taste (unless refined) | Neutral, slight chocolate aroma | Nutty, rich |
| Best For | Melt-in-your-mouth chocolates, truffles | Classic chocolate bars, white/dark chocolate | Soft chocolate spreads, nutty chocolates |
| Storage | Needs refrigeration to stay firm | Stays solid at room temperature | Softens easily, best stored chilled |
💡 Pro Tip: You can combine different fats to create a balance of texture and stability. For example:
- Mix cocoa butter with a bit of coconut oil for a balance of firmness and smooth melting.
- Blend nut butter with coconut oil for a softer, spreadable chocolate.
Flavor Enhancements: Vanilla Extract, Sea Salt, or Spices?
Enhancing the flavor of vegan chocolate goes beyond just using high-quality cocoa or cacao powder. Adding subtle yet impactful ingredients like vanilla extract, sea salt, or warming spices can elevate your chocolate from basic to gourmet. These flavor boosters help balance bitterness, enhance sweetness, and create a more complex, irresistible taste experience.
Below, we explore the benefits of each flavor enhancement and how to use them effectively in your homemade vegan chocolate recipe.
1. Vanilla Extract – Sweet & Aromatic Depth
🌿 What is it?
Vanilla extract is made by steeping vanilla beans in alcohol, releasing rich, floral, and slightly sweet flavors. It is one of the most common flavor enhancers in chocolate-based recipes because it helps round out bitterness and enhances natural sweetness.
✅ Enhances sweetness without adding sugar.
✅ Balances the bitter notes of cocoa or cacao powder.
✅ Adds depth and warmth to chocolate flavors.
✅ Pairs well with almost any chocolate recipe (dark, milk, or white vegan chocolate).
💡 How to Use It:
- Add ½ to 1 teaspoon of pure vanilla extract per batch of chocolate.
- Use vanilla bean paste or powder for a more intense and natural flavor.
- For a raw vegan version, use alcohol-free vanilla extract or scrape out the seeds from a vanilla bean.
⚠️ Consideration:
- Adding too much vanilla extract can create a slightly alcoholic aftertaste if not properly mixed.
2. Sea Salt – Enhancing Sweetness & Depth
🌿 What is it?
Salt in chocolate may seem unusual, but it is one of the best-kept secrets for enhancing chocolate’s natural flavor. A touch of high-quality sea salt or Himalayan pink salt helps highlight sweetness, balance bitterness, and add an elegant contrast to the chocolate’s rich profile.
✅ Enhances the natural sweetness of chocolate.
✅ Balances bitterness, especially in dark chocolate recipes.
✅ Creates a gourmet touch with a hint of saltiness.
✅ Works well in both solid chocolate bars and melted chocolate sauces.
💡 How to Use It:
- Use a pinch (⅛ teaspoon) of fine sea salt per chocolate batch.
- For a gourmet touch, sprinkle flaky sea salt (e.g., Maldon or Fleur de Sel) on top of finished chocolates.
- If using salted nut butter, adjust additional salt accordingly.
⚠️ Consideration:
- Be careful not to overdo the salt, as it can quickly overpower the chocolate. Start with a tiny pinch and adjust as needed.
3. Spices – Adding Warmth & Complexity
🌿 What is it?
Spices can transform ordinary chocolate into an exciting, globally inspired treat. From warming cinnamon to spicy cayenne, spices can add a unique twist to your vegan chocolate recipe, making it even more indulgent and memorable.
✅ Cinnamon: Adds warmth and pairs beautifully with dark chocolate.
✅ Cardamom: Brings an exotic floral note with a hint of citrus.
✅ Cayenne or Chili Powder: Creates a spicy Mexican-style chocolate experience.
✅ Nutmeg: Adds a mild sweetness and depth.
✅ Pumpkin Spice Blend: A cozy fall-inspired flavor.
💡 How to Use It:
- Start with ¼ to ½ teaspoon of your chosen spice per batch.
- Combine cinnamon and a dash of cayenne for a Mexican hot chocolate vibe.
- Mix pumpkin spice or nutmeg for a cozy holiday twist.
- Infuse chocolate with cardamom for a sophisticated, slightly citrusy aroma.
⚠️ Consideration:
- Some spices, like cayenne, can be overpowering, so start with a small amount and taste as you go.
4. Bonus Flavor Enhancements: Unique Additions
Beyond vanilla, sea salt, and spices, you can experiment with other flavor-enhancing ingredients to create custom chocolate variations:
✔️ Espresso Powder – Intensifies chocolate flavor without making it taste like coffee.
✔️ Orange or Lemon Zest – Adds a fresh citrus twist.
✔️ Almond or Hazelnut Extract – Enhances nuttiness in chocolate.
✔️ Coconut Extract – Complements tropical chocolate recipes.
Step-by-Step Guide to Making the Perfect Vegan Chocolate
Step 1: Melt the Ingredients Properly
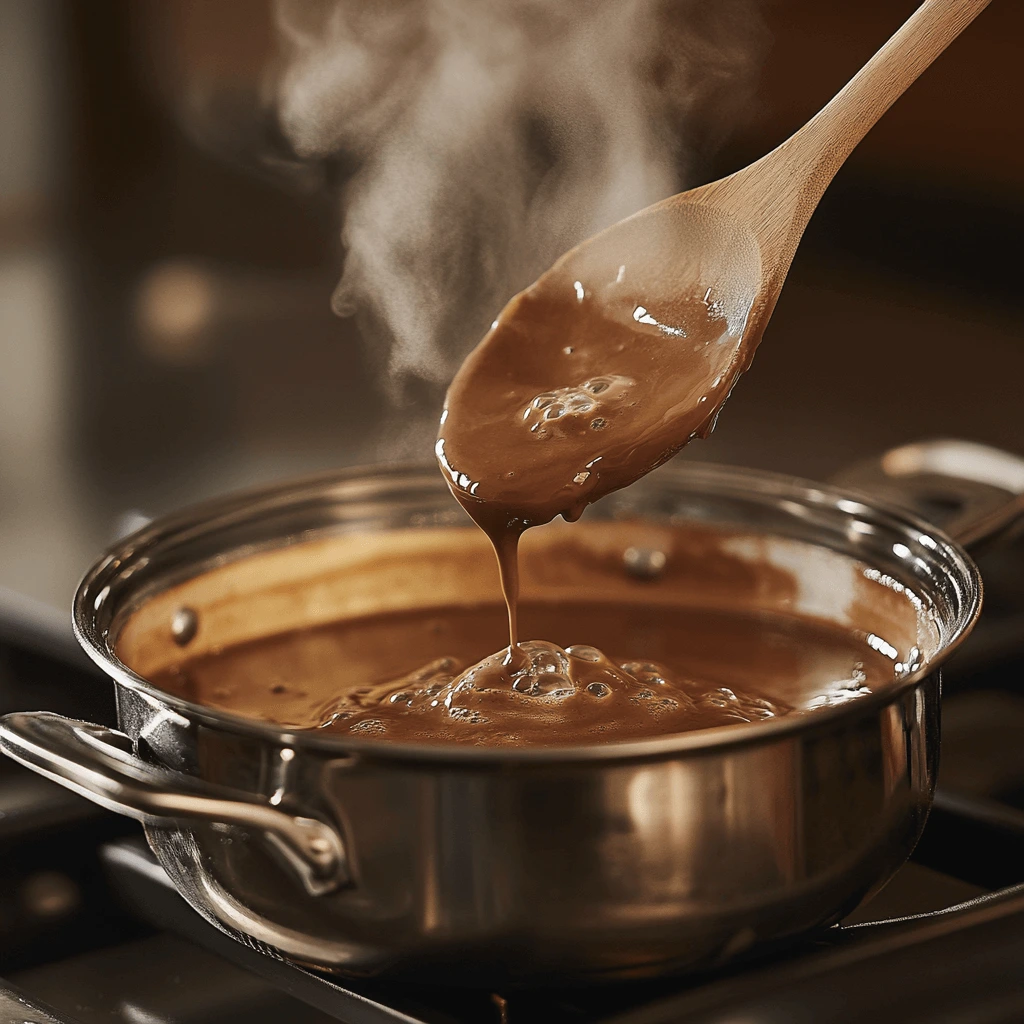
Melting the fat properly is the first and most crucial step in making smooth, high-quality vegan chocolate. The type of fat you use—whether cocoa butter or coconut oil—will determine the texture, firmness, and melting point of your chocolate. To ensure a silky, lump-free consistency, it’s important to melt the ingredients gently and evenly over low heat without burning them.
In this step, we’ll cover:
✔️ Why melting temperature matters
✔️ How to properly melt cocoa butter and coconut oil
✔️ The best melting methods: Double boiler vs. microwave
✔️ Tips to prevent overheating and burning
1. Why Low-Heat Melting is Essential
Cocoa butter and coconut oil are delicate ingredients that can become grainy, burnt, or lose their beneficial properties if exposed to excessive heat.
🔥 Overheating can cause:
- Separation of fats, leading to uneven chocolate texture.
- Loss of antioxidants and nutrients found in cocoa butter.
- Burnt or bitter flavors, especially with direct heat exposure.
- Chocolate that doesn’t set properly, making it too soft or greasy.
To avoid these issues, it’s best to melt these fats slowly over low heat using the double boiler method or short microwave bursts.
2. How to Properly Melt Cocoa Butter & Coconut Oil
🟢 Cocoa Butter:
- Cocoa butter melts at 93–97°F (34–36°C).
- It takes longer to melt compared to coconut oil due to its higher melting point.
- It should be melted slowly to maintain its smooth, glossy texture.
🟢 Coconut Oil:
- Coconut oil melts at 76°F (24°C), making it much quicker to liquefy.
- It’s naturally softer and doesn’t require as much heat as cocoa butter.
- Works best when gently melted to prevent an oily or greasy consistency.
💡 Pro Tip: If you’re using a blend of cocoa butter and coconut oil, melt them together over low heat to ensure they integrate smoothly.
3. The Best Melting Methods: Double Boiler vs. Microwave
Option 1: Double Boiler Method (Recommended for Even Melting)
The double boiler method (also called a bain-marie) is the best way to melt cocoa butter and coconut oil because it provides gentle, indirect heat, reducing the risk of burning or overheating.
🔹 What You Need:
✔️ A heatproof glass or metal bowl
✔️ A saucepan with a few inches of water
🔹 Steps:
1️⃣ Fill a small saucepan with 1-2 inches of water and bring to a gentle simmer (not a rolling boil).
2️⃣ Place a heatproof bowl on top of the saucepan, ensuring it doesn’t touch the water (the steam will gently melt the fat).
3️⃣ Add the cocoa butter or coconut oil to the bowl and stir occasionally with a silicone spatula until fully melted.
4️⃣ Once completely melted, remove the bowl from the heat and let it cool slightly before adding sweeteners or cocoa powder.
✅ Why This Works Best:
- Prevents direct heat contact, avoiding burning or overheating.
- Allows for slow, even melting, creating a silky-smooth texture.
- Works well for larger batches of chocolate.
⚠️ Common Mistakes to Avoid:
❌ Don’t let the bowl touch the simmering water—this can overheat the ingredients.
❌ Avoid high heat, as it can cause separation and a grainy texture.
❌ Stir gently to prevent air bubbles from forming.
Option 2: Microwave Method (Quick, But Risky)
If you’re short on time, the microwave method can work, but it requires careful monitoring to prevent overheating.
🔹 Steps:
1️⃣ Place cocoa butter or coconut oil in a microwave-safe bowl.
2️⃣ Heat in 15-20 second intervals, stirring between each interval.
3️⃣ Continue heating in short bursts until fully melted.
✅ Why This Works:
- Faster than the double boiler method.
- Ideal for small batches or quick recipes.
⚠️ Common Mistakes to Avoid:
❌ Overheating can cause cocoa butter to become bitter or separate.
❌ Uneven melting can lead to lumpy chocolate.
❌ If not stirred properly, hot spots can burn certain areas.
💡 Pro Tip: If using the microwave, always stir between each heating interval to distribute heat evenly.
4. Key Tips for Perfectly Melted Chocolate Ingredients
✅ Use a kitchen thermometer to keep the temperature below 118°F (48°C) (especially important for raw vegan chocolate).
✅ Chop cocoa butter into small pieces for faster and more even melting.
✅ Never melt directly on a stovetop pan, as this leads to burnt chocolate.
✅ If adding sweeteners, let the melted fat cool slightly before stirring in maple syrup, coconut sugar, or date paste. Adding sweeteners when the fat is too hot can cause separation or grittiness.
Step 2: Mixing & Sweetening
Once the cocoa butter or coconut oil has been properly melted, the next crucial step is mixing in the dry ingredients and sweeteners. This step ensures a smooth, well-balanced flavor while creating a silky texture in your homemade vegan chocolate.
In this section, we’ll explore:
✔️ The right way to incorporate cocoa powder for a lump-free consistency.
✔️ How vanilla extract enhances the depth of chocolate flavor.
✔️ Choosing and adding natural sweeteners like maple syrup without causing separation.
✔️ Mixing techniques to achieve a smooth, glossy finish.
1. Adding Cocoa Powder – The Foundation of Chocolate
Cocoa powder is what gives chocolate its rich, deep flavor. When choosing cocoa powder for your vegan chocolate recipe, you’ll typically have two main options:
✔️ Natural Cocoa Powder: Slightly acidic, fruity, and commonly used in dark chocolate.
✔️ Dutch-Processed Cocoa Powder: Milder, less acidic, and darker in color due to alkalization.
💡 How to Add Cocoa Powder Correctly
To avoid lumps and ensure even distribution, follow these steps when incorporating cocoa powder into the melted fat:
1️⃣ Sift the cocoa powder before adding it to remove any clumps.
2️⃣ Slowly whisk or stir it in small amounts rather than dumping it all at once.
3️⃣ Use a silicone spatula or wire whisk to blend it thoroughly.
4️⃣ Continue stirring until the mixture is completely smooth and lump-free.
⚠️ Common Mistakes to Avoid:
❌ Adding cocoa powder all at once can create stubborn lumps.
❌ Using cold cocoa powder may cause uneven mixing. Allow it to come to room temperature.
2. Enhancing Flavor with Vanilla Extract
Vanilla extract is a key ingredient in chocolate making. Though subtle, it enhances the chocolate’s natural flavors, giving it a more rounded and aromatic profile.
✔️ Balances the bitterness of cocoa powder.
✔️ Adds natural sweetness without extra sugar.
✔️ Brings a warm, aromatic depth to the chocolate.
💡 How to Add Vanilla Extract
1️⃣ Use pure vanilla extract for the best flavor (avoid artificial versions).
2️⃣ Stir in ½ to 1 teaspoon of vanilla extract once the cocoa powder is fully blended.
3️⃣ Mix well to distribute the vanilla evenly throughout the chocolate.
⚠️ Important Tip:
Since vanilla extract contains alcohol, adding too much can create a slightly sharp taste. Keep the quantity balanced for a smooth flavor.
3. Choosing and Adding Sweeteners Without Causing Separation
Sweeteners play a vital role in balancing the bitterness of cocoa powder, but they must be added carefully to maintain the chocolate’s smooth consistency.
Best Vegan Sweeteners for Chocolate:
✔️ Maple Syrup: Smooth, mild, and blends well with melted ingredients.
✔️ Date Syrup: Thick, caramel-like, and rich in fiber.
✔️ Agave Syrup: Neutral flavor and a great liquid alternative.
✔️ Coconut Sugar (Powdered): Gives a slight caramel taste but should be blended well to avoid graininess.
💡 How to Properly Add Maple Syrup (or Other Liquid Sweeteners):
1️⃣ Let the melted fat cool slightly before adding sweetener (if it’s too hot, the sweetener may separate).
2️⃣ Pour in 1-2 tablespoons of maple syrup gradually, stirring continuously.
3️⃣ Keep whisking until the sweetener fully dissolves and integrates with the cocoa butter/coconut oil.
⚠️ Avoid These Common Issues:
❌ Separation: If maple syrup is added to very hot oil, it can cause separation (since water-based ingredients don’t always mix well with fats).
❌ Graininess: If using coconut sugar, make sure it’s powdered or fully dissolved to prevent a gritty texture.
4. Mixing Techniques for a Smooth, Glossy Finish
Achieving the perfect silky-smooth texture in your vegan chocolate requires proper mixing. Here are the best techniques:
✔️ Use a Whisk or Hand Blender: This helps emulsify the cocoa powder and sweetener into the melted fats.
✔️ Slow, Consistent Stirring: Stir continuously in a circular motion to keep the ingredients well-integrated.
✔️ Check for Clumps: If lumps remain, strain the mixture through a fine mesh sieve for a smoother result.
💡 Pro Tip: If you notice separation, gently heat the mixture over low heat and whisk vigorously to re-emulsify the ingredients.
Step 3: Pouring & Shaping
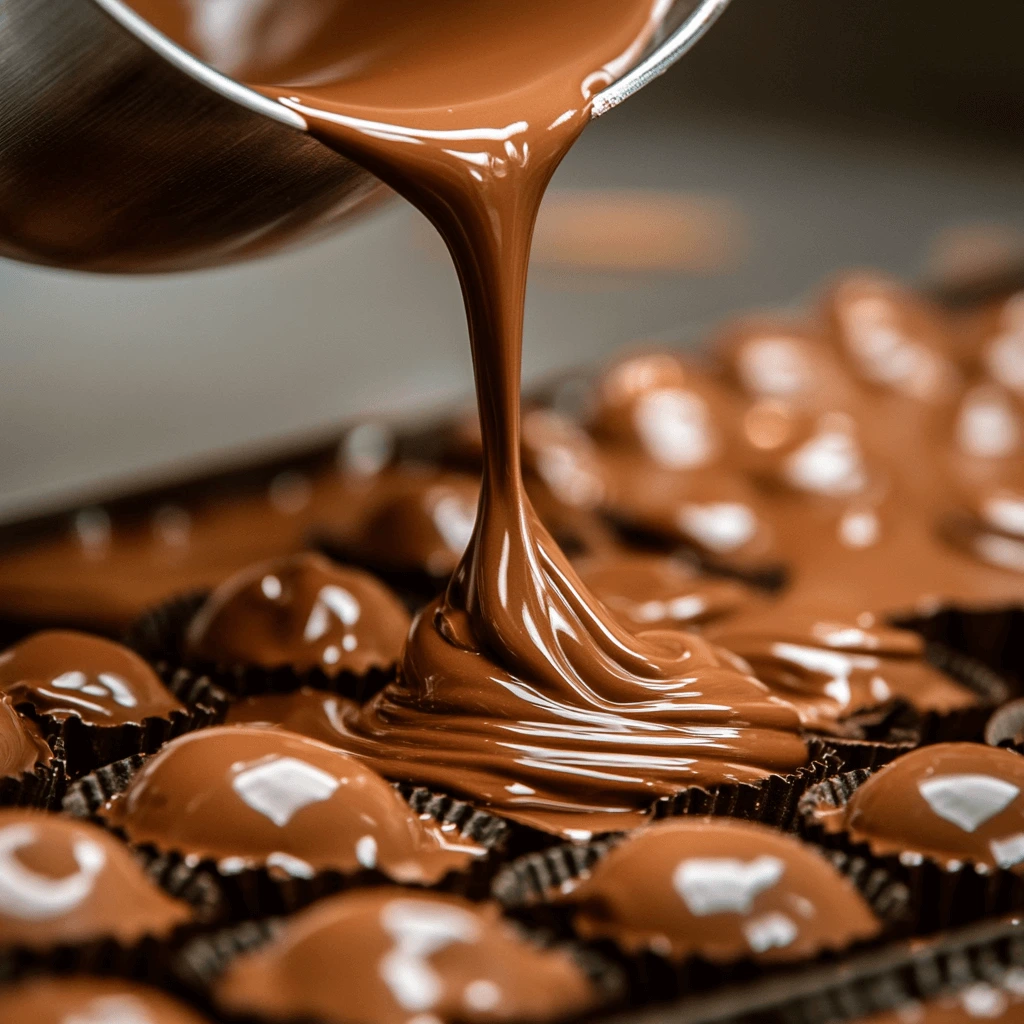
Once your vegan chocolate mixture is smooth, well-mixed, and perfectly sweetened, the next crucial step is pouring and shaping it to achieve the desired form. This step determines not just the final appearance of your chocolate but also its texture, snap, and ease of serving.
In this section, we’ll explore:
✔️ Choosing the right mold for different chocolate styles.
✔️ How to properly pour and distribute the mixture evenly.
✔️ Alternative methods if you don’t have chocolate molds.
✔️ Tips for achieving a smooth, professional finish.
1. Choosing the Right Mold for Your Chocolate
The type of mold or tray you use will affect the final shape and texture of your chocolate. Below are different options depending on your desired outcome:
🔹 Chocolate Bar Molds – If you want to make classic chocolate bars, use silicone or plastic bar molds. These create smooth, professional-looking bars with a clean snap.
🔹 Chocolate Truffle or Bonbon Molds – These are ideal if you want bite-sized, elegant chocolates. They come in various shapes like hearts, squares, and domes.
🔹 Silicone Ice Cube Trays – A great budget-friendly alternative to chocolate molds! They work well for small chocolate bites and are easy to use.
🔹 Mini Cupcake Liners – Perfect for making chocolate cups with fillings like nut butter or fruit puree.
🔹 Baking Trays & Parchment Paper – If you prefer a more rustic, bark-style chocolate, simply pour the mixture onto a flat baking tray lined with parchment paper.
💡 Pro Tip: Always choose food-grade, flexible silicone molds for easy chocolate release. Plastic molds work too, but they require a bit more effort to remove the chocolate cleanly.
2. How to Properly Pour and Distribute the Mixture
Once your mold is ready, it’s time to pour the melted chocolate into it carefully to ensure even distribution. Follow these steps:
1️⃣ Stir the chocolate mixture one last time to make sure no ingredients have settled at the bottom.
2️⃣ Slowly pour the chocolate into the molds, using a small ladle, measuring cup, or spoon for better control.
3️⃣ Fill the mold evenly, leaving a little space at the top to prevent overflow.
4️⃣ Gently tap the mold against the countertop to release air bubbles and create a smooth, even surface.
5️⃣ If making chocolate bark, spread the mixture evenly on a parchment-lined baking tray, using a spatula to smooth it out.
⚠️ Common Mistakes to Avoid:
❌ Pouring too quickly can cause spillage and air pockets.
❌ Not tapping the mold can leave bubbles or uneven surfaces in your chocolate.
❌ Overfilling can make it hard to remove chocolates cleanly from the mold.
3. Alternative Methods if You Don’t Have Molds
If you don’t have chocolate molds, don’t worry! Here are three easy shaping alternatives:
✔️ Chocolate Bark: Pour the mixture onto a baking tray lined with parchment paper, then use a spatula to spread it into a thin layer. Once set, break it into irregular pieces.
✔️ Chocolate Drops: Use a teaspoon to scoop and drop small rounds of chocolate onto parchment paper. These work great as homemade chocolate chips or snack bites.
✔️ Chocolate Slabs: Pour the mixture into a small rectangular dish lined with parchment paper, let it set, then cut it into square or rectangle bars once firm.
💡 Pro Tip: For added flavor and texture, sprinkle toppings (nuts, sea salt, coconut flakes, or freeze-dried fruit) onto the chocolate before it hardens.
4. Achieving a Smooth, Professional Finish
If you want glossy, smooth, and professional-looking chocolate, follow these key tips:
✅ Work Quickly: The chocolate will start to firm up as it cools, so pour and shape it immediately after mixing.
✅ Remove Air Bubbles: Tap the molds on the counter 2-3 times to remove air pockets.
✅ Smooth the Surface: If needed, use a spatula or knife to level out the chocolate for a perfect finish.
✅ Let It Set Properly: Allow the chocolate to cool at room temperature before transferring it to the fridge or freezer.
⚠️ Avoid These Mistakes:
❌ Don’t stir too much after pouring, or it can create swirls and uneven textures.
❌ Don’t put it in the freezer immediately—it can cause chocolate to develop white streaks (fat bloom) due to rapid temperature changes.
Step 4: Chilling & Storing Your Vegan Chocolate
After pouring and shaping your vegan chocolate, the final crucial step is chilling and storing it correctly. Proper chilling ensures that your chocolate sets with a firm, smooth texture, while proper storage maintains its flavor, consistency, and freshness over time.
In this section, we’ll cover:
✔️ Best chilling methods to achieve the perfect texture.
✔️ How long to let the chocolate set before eating or storing.
✔️ Best storage practices to keep your chocolate fresh and avoid melting or blooming.
✔️ How to extend the shelf life of homemade vegan chocolate.
1. Best Chilling Methods for a Perfect Set
Once your chocolate is poured and shaped, it needs time to firm up properly. There are three main ways to chill it, depending on how quickly you want it to set:
✅ Room Temperature (Best for Professional Finish – 1-2 Hours)
- Allowing chocolate to set naturally at room temperature (18-22°C / 64-72°F) helps prevent condensation and ensures a smooth texture without streaks.
- This method is ideal for tempered chocolate, as sudden temperature changes can ruin its snap and shine.
✅ Refrigerator (Quick Method – 30-60 Minutes)
- If you’re short on time, place your chocolate molds in the fridge to set within an hour.
- This is a good option for everyday homemade chocolate but may cause minor fat bloom (white streaks) if stored for too long.
✅ Freezer (Fastest Method – 10-20 Minutes)
- If you need your chocolate to harden very quickly, place it in the freezer.
- However, freezing can lead to moisture condensation, making the chocolate prone to texture changes when thawed.
💡 Pro Tip: For the best results, start by chilling in the fridge for 30 minutes, then transfer to room temperature for final setting.
⚠️ Avoid These Common Mistakes:
❌ Do not place warm chocolate directly into the freezer, as sudden cooling can cause cracking.
❌ Never cover warm chocolate tightly, as it can trap moisture and create condensation.
❌ Do not leave chocolate in the fridge/freezer for too long, as it may absorb odors from other foods.
2. How Long Should You Let It Set?
The exact setting time depends on the chilling method and the type of chocolate you’re making. Here’s a general guideline:
- Chocolate bars & molded chocolates: 45 minutes to 2 hours (depending on chilling method).
- Chocolate bark or slab-style chocolate: 30-60 minutes.
- Chocolate truffles or bonbons with fillings: 1-3 hours to fully firm up.
- Large chocolate pieces (e.g., thick bars): Up to 3-4 hours for a completely solid texture.
💡 How to Know When It’s Ready:
✔️ The surface should be firm and dry to the touch.
✔️ It should release easily from the mold without sticking.
✔️ When snapped, it should break cleanly without bending (for tempered chocolate).
3. Best Storage Practices to Keep Your Chocolate Fresh
Proper storage is key to maintaining the texture, flavor, and quality of homemade vegan chocolate. Here are the best ways to store it:
✅ At Room Temperature (Best for Tempered Chocolate – Up to 2-3 Weeks)
- Store in an airtight container at a cool, dry place (16-20°C / 60-68°F).
- Keep away from direct sunlight, humidity, and heat sources.
- Ideal for well-tempered chocolate that doesn’t contain perishable ingredients.
✅ In the Refrigerator (For Longer Freshness – Up to 1 Month)
- If you live in a warm climate, store chocolate in an airtight container in the fridge.
- Wrap it in parchment paper or foil before placing it in a sealed container to prevent it from absorbing fridge odors.
- Before eating, let it sit at room temperature for 10-15 minutes to avoid condensation.
✅ In the Freezer (For Long-Term Storage – Up to 3 Months)
- If you want to store chocolate for several months, freezing is an option.
- Wrap chocolate tightly in parchment paper, then place it in a zip-lock bag to prevent moisture exposure.
- Before eating, thaw it gradually in the fridge for a few hours, then bring it to room temperature to prevent condensation.
⚠️ Storage Mistakes to Avoid:
❌ Do not store chocolate in the fridge without an airtight container—it will absorb smells from other foods.
❌ Avoid sudden temperature changes (going directly from freezer to room temperature can cause sugar bloom).
❌ Do not store chocolate near spices, onions, or strong-smelling foods—chocolate easily absorbs odors.
4. How to Extend the Shelf Life of Homemade Vegan Chocolate
Homemade chocolate lacks preservatives, but you can extend its freshness by following these tips:
✔️ Use tempered chocolate – Tempering stabilizes chocolate and prevents melting or bloom.
✔️ Keep moisture away – Store chocolate in a dry environment to prevent sugar bloom.
✔️ Use food-grade desiccant packets – These absorb excess moisture in storage containers.
✔️ Vacuum-seal if freezing – This prevents air and humidity from affecting the chocolate.
✔️ Store with cocoa butter paper – Wrapping chocolate in cocoa butter-coated parchment paper helps preserve texture.
💡 Shelf Life Estimates:
- Tempered dark chocolate: Up to 6 months at room temperature.
- Un-tempered homemade chocolate: 3-4 weeks in a cool pantry, up to 1 month in the fridge.
- Chocolate with fillings (nut butter, fruit puree): 1-2 weeks refrigerated.
Delicious Variations of Vegan Chocolate Recipes
No-Bake Chocolate Bars: Add Nuts, Dried Fruit, or Shredded Coconut
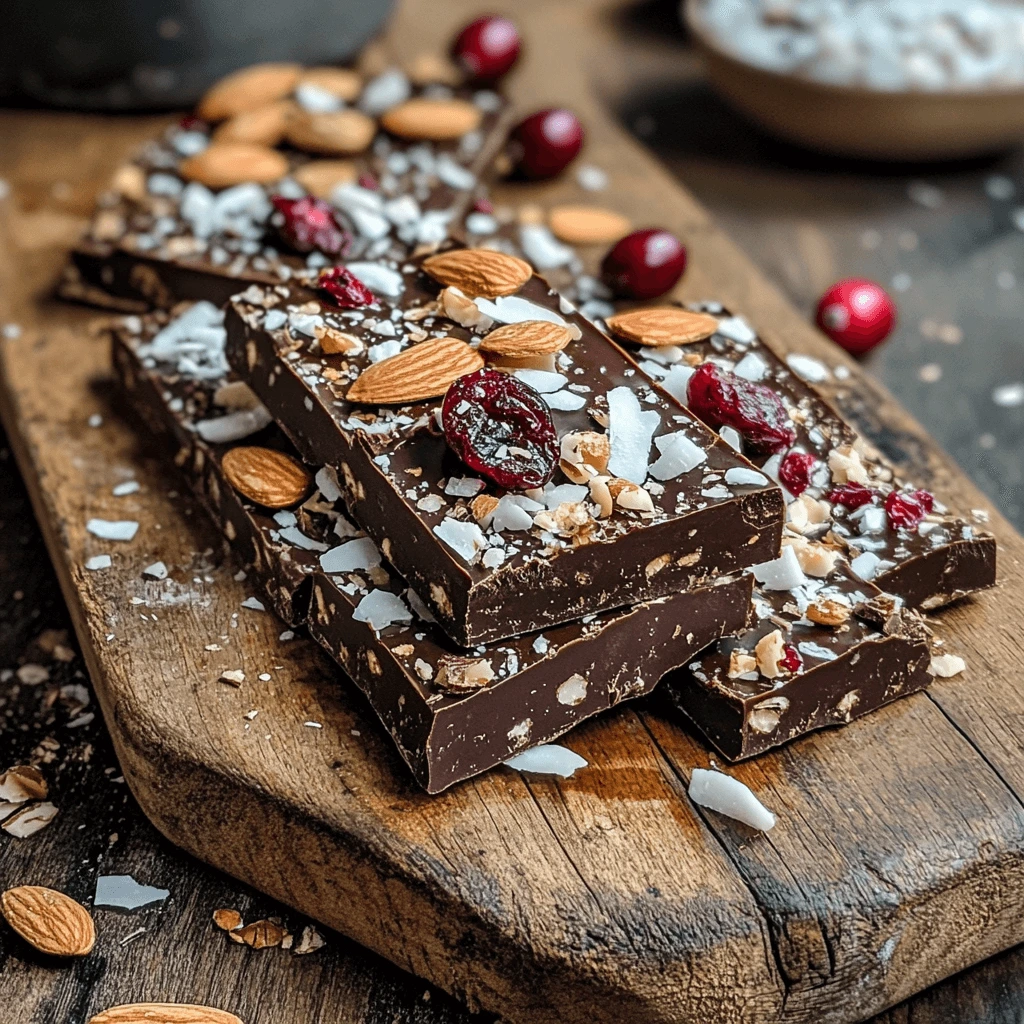
Homemade no-bake vegan chocolate bars are a delicious, easy-to-make treat that requires minimal effort but delivers maximum flavor and texture. By adding nuts, dried fruit, or shredded coconut, you can enhance the taste and nutritional value while keeping the recipe fully plant-based and customizable.
In this section, we’ll explore:
✔️ Why no-bake chocolate bars are a great option
✔️ How to choose the best mix-ins for flavor and texture
✔️ Ideas for creating different variations with nuts, dried fruit, and coconut
✔️ Tips for achieving the perfect consistency without baking
1. Why No-Bake Chocolate Bars?
No-bake chocolate bars are one of the easiest homemade treats because they:
✅ Require no oven or special equipment – Simply mix, pour, chill, and enjoy.
✅ Maintain the natural health benefits of raw cacao, coconut oil, and other ingredients.
✅ Are fully customizable – You can adjust the texture, sweetness, and flavor.
✅ Offer endless possibilities – Add crunch with nuts, chewiness with dried fruit, or richness with coconut.
✅ Are perfect for meal prep – Make a batch and store them for quick snacks.
Since these bars do not require baking, the ingredients retain their nutrients and antioxidants, making them a healthier alternative to store-bought chocolates.
2. Best Mix-Ins for Flavor & Texture
Adding nuts, dried fruit, or shredded coconut not only enhances the taste but also improves the texture of your chocolate bars. Here’s how each ingredient contributes:
✔️ Nuts – Crunchy & Nutritious
Nuts add a satisfying crunch, a dose of healthy fats, and protein. The best nuts to use include:
💡 Pro Tip: Lightly toast nuts before adding them for a more intense, nutty flavor.
- Almonds – Classic pairing with chocolate, providing a firm crunch.
- Walnuts – Buttery and slightly bitter, balancing the sweetness of chocolate.
- Pecans – Sweet and soft, adding richness.
- Hazelnuts – Perfect for a Nutella-like flavor.
- Cashews – Mild and creamy, blending well with dark chocolate.
- Pistachios – Slightly salty and vibrant green, making bars visually appealing.
✔️ Dried Fruit – Naturally Sweet & Chewy
Dried fruit adds a chewy texture and natural sweetness, reducing the need for added sugars. Great options include:
- Raisins – A classic choice that enhances sweetness.
- Cranberries – Tart and tangy, balancing the richness of chocolate.
- Chopped Dates – Soft and caramel-like in taste.
- Dried Apricots – Slightly tangy and firm.
- Goji Berries – Packed with antioxidants, adding a slight tartness.
- Chopped Figs – Sweet with tiny crunchy seeds for extra texture.
💡 Pro Tip: Soak dried fruit in warm water or orange juice for 10 minutes to make them extra soft before adding them to the chocolate mixture.
✔️ Shredded Coconut – Rich & Tropical
Coconut pairs perfectly with chocolate and brings a light, chewy texture. Choose from:
- Unsweetened shredded coconut – Delicate coconut flavor without added sugar.
- Toasted coconut flakes – Enhances crunch and caramelized coconut flavor.
- Coconut chips – Larger flakes for extra chewiness.
💡 Pro Tip: If using shredded coconut, mix it directly into the chocolate. If using coconut flakes, sprinkle on top before chilling for an attractive finish.
3. How to Make No-Bake Chocolate Bars with Mix-Ins
Step 1: Prepare the Base
Start by melting the coconut oil or cocoa butter over low heat. Then, whisk in the cacao or cocoa powder, vanilla extract, and sweetener (e.g., maple syrup, date syrup, or coconut sugar). Stir until smooth.
Step 2: Mix in the Ingredients
Once the chocolate mixture is smooth, fold in your chopped nuts, dried fruit, or shredded coconut. Ensure the mix-ins are evenly distributed so every bite has texture and flavor.
Step 3: Pour & Spread
Pour the mixture into a lined baking dish or silicone mold and spread it evenly. You can also sprinkle extra nuts or coconut flakes on top for a decorative finish.
Step 4: Chill & Set
Place the dish in the refrigerator for at least 1 hour (or 20-30 minutes in the freezer) until firm.
Step 5: Slice & Enjoy
Once fully set, remove from the dish, slice into bars, and enjoy your homemade no-bake vegan chocolate bars!
4. Variations & Flavor Ideas
💡 Try these delicious flavor combinations:
✅ Almond & Cranberry Chocolate Bars – Crunchy almonds + tart cranberries for a sweet-tangy contrast.
✅ Pistachio & Coconut Dark Chocolate Bars – A tropical twist with a slightly salty edge.
✅ Walnut & Date Caramel Bars – Naturally sweet with soft and crunchy textures.
✅ Hazelnut & Orange Zest Bars – Inspired by European chocolate flavors.
✅ Goji Berry & Cashew Bars – A superfood combination with creamy cashews and antioxidant-rich berries.
5. Storage Tips for No-Bake Chocolate Bars
To keep your homemade bars fresh and delicious:
✔️ Room Temperature (Best for Tempered Chocolate) – Store in an airtight container in a cool, dry place for up to 2 weeks.
✔️ Refrigerator (For Softer Chocolate) – Keep in a sealed container for up to 1 month.
✔️ Freezer (For Long-Term Storage) – Store in freezer-safe bags for up to 3 months. Thaw for a few minutes before eating.
💡 Pro Tip: Separate bars with parchment paper to prevent them from sticking together.
High-Protein Chocolate: Mix in Plant-Based Protein Powder
If you’re looking for a way to enjoy rich, indulgent vegan chocolate while also boosting your protein intake, adding plant-based protein powder is the perfect solution. High-protein chocolate is an excellent snack for athletes, fitness enthusiasts, or anyone looking to support muscle recovery while satisfying their sweet tooth.
In this section, we’ll explore:
✔️ Why high-protein chocolate is a great option
✔️ Best plant-based protein powders to use
✔️ How to mix protein powder into your chocolate for a smooth texture
✔️ Flavor variations and customization ideas
1. Why Make High-Protein Chocolate?
Protein is an essential macronutrient that supports muscle growth, satiety, and overall health. However, many store-bought chocolates are low in protein and high in refined sugars, making them less ideal for a balanced diet. By incorporating plant-based protein powder into homemade chocolate, you can:
✅ Boost your daily protein intake – Great for post-workout recovery or an energizing snack.
✅ Improve satiety – Keeps you full longer and helps regulate blood sugar levels.
✅ Create a more balanced treat – Combines healthy fats, antioxidants, and protein for a nutrient-dense option.
✅ Customize flavors & textures – Different protein powders add unique tastes and consistencies to your chocolate.
2. Best Plant-Based Protein Powders for Chocolate
Not all protein powders mix well with chocolate, so choosing the right type is key to maintaining a smooth, creamy texture. Here are some plant-based protein powders that work best:
✔️ Pea Protein Powder
- Mild, neutral flavor that pairs well with cocoa or cacao powder.
- High in essential amino acids, making it a great complete protein source.
- Best when mixed with a little liquid (e.g., coconut milk) to prevent dryness.
✔️ Brown Rice Protein Powder
- Slightly grainier texture but easily digestible.
- Works well when combined with other protein sources for a balanced amino acid profile.
- Has a mild nutty flavor that enhances the richness of chocolate.
✔️ Hemp Protein Powder
- Naturally high in omega-3 fatty acids and fiber.
- Slightly earthy taste, which pairs well with sweeteners like maple syrup or coconut sugar.
- Best used in smaller amounts to avoid an overpowering flavor.
✔️ Pumpkin Seed Protein Powder
- Mild, slightly nutty flavor that blends well with cacao or cocoa powder.
- Rich in iron, magnesium, and zinc, making it a highly nutritious addition.
- Works great in chocolate bars or truffles for added creaminess.
💡 Pro Tip: If your protein powder has a strong flavor or gritty texture, blend it with a liquid ingredient (like coconut milk or nut butter) before adding it to the chocolate mixture to create a smoother consistency.
3. How to Add Protein Powder to Vegan Chocolate
Incorporating plant-based protein powder into homemade chocolate requires a few key steps to ensure a smooth, non-grainy texture. Here’s how to do it:
Step 1: Melt the Chocolate Base
- Melt coconut oil or cocoa butter over low heat until smooth.
- Whisk in cocoa or cacao powder and a natural sweetener like maple syrup.
Step 2: Mix in Protein Powder Gradually
- Slowly sift in the protein powder to avoid clumping.
- Stir continuously while adding to maintain a silky texture.
- If the mixture becomes too thick, add a little non-dairy milk (like almond or coconut milk) to keep it smooth.
Step 3: Customize & Enhance the Flavor
- Add vanilla extract, cinnamon, or a pinch of sea salt for extra depth.
- Mix in nut butter (like almond or peanut butter) to enhance creaminess and complement the protein powder.
Step 4: Pour, Set, & Enjoy
- Pour the protein-packed chocolate mixture into molds, a lined tray, or silicone cups.
- Chill in the fridge for at least 30 minutes until firm.
4. Flavor Variations & Customization Ideas
💡 Enhance your high-protein chocolate with these fun variations:
✅ Chocolate Peanut Butter Protein Bars – Add peanut butter + pea protein for a Reese’s-inspired flavor.
✅ Coconut & Almond High-Protein Chocolate – Mix in shredded coconut + almond protein for a tropical twist.
✅ Chili Dark Chocolate Protein Bites – Add a pinch of cayenne pepper for a spicy kick.
✅ Vanilla Cinnamon Protein Truffles – Combine vanilla protein + cinnamon for a warm, cozy flavor.
✅ Mocha High-Protein Chocolate – Blend in a little instant coffee or espresso powder for a bold, energizing treat.
5. Storage Tips for High-Protein Chocolate
Since protein powder absorbs moisture, high-protein chocolate may have a slightly different texture than traditional chocolate. Here’s how to store it properly:
✔️ Refrigerator (Best Option): Store in an airtight container for up to 2 weeks.
✔️ Freezer (Long-Term Storage): Keep in a freezer-safe bag for up to 3 months.
✔️ Room Temperature: If your home is cool, you can store it for a few days, but warmer temperatures may cause melting.
💡 Pro Tip: If the chocolate becomes too firm, let it sit at room temperature for a few minutes before eating.
Keto-Friendly Chocolate: Use a Sugar Substitute Like Stevia or Monk Fruit

If you’re following a keto diet but still crave a delicious, indulgent chocolate treat, making keto-friendly chocolate is a perfect solution. Traditional chocolate often contains refined sugars and high-carb sweeteners, which can spike blood sugar and kick you out of ketosis. By using low-carb sugar substitutes like stevia or monk fruit, you can create a chocolate that is rich, satisfying, and completely keto-approved.
In this section, we’ll explore:
✔️ Why keto-friendly chocolate is a great option
✔️ Best sugar substitutes for keto chocolate
✔️ How to adjust sweetness without affecting texture
✔️ Flavor variations and customization ideas
1. Why Make Keto-Friendly Chocolate?
A keto diet is based on low-carb, high-fat principles, which means traditional chocolates packed with sugar aren’t suitable. However, homemade keto chocolate offers several benefits:
✅ Low in carbs, high in healthy fats – Perfect for sustaining ketosis.
✅ No blood sugar spikes – Maintains stable energy levels.
✅ Rich in antioxidants – Cacao and cocoa powder provide essential nutrients.
✅ Fully customizable – Adjust sweetness, flavors, and texture to your preference.
By choosing the right sweetener and fat sources, you can enjoy delicious keto chocolate guilt-free!
2. Best Sugar Substitutes for Keto Chocolate
The key to making keto-friendly chocolate is using low-carb sweeteners that don’t impact blood sugar levels. Here are the best options:
✔️ Monk Fruit Sweetener
- 100% natural and zero glycemic impact.
- Extracted from monk fruit, offering a mild sweetness without aftertaste.
- Available as a powder or liquid, making it easy to blend into chocolate.
✔️ Stevia
- One of the most popular natural sugar alternatives.
- Highly concentrated—just a few drops or a small amount is enough.
- Works best in liquid or powdered form to mix smoothly with melted chocolate.
✔️ Erythritol or Allulose
- Sugar alcohols with a taste and texture very similar to sugar.
- Zero net carbs and do not spike blood sugar.
- Granulated erythritol may leave a cooling effect, so powdered or liquid forms blend better.
💡 Pro Tip: If using erythritol or allulose, blend it into a fine powder before adding to melted chocolate to prevent a grainy texture.
3. How to Make Keto Chocolate with Sugar Substitutes
Making keto-friendly chocolate is similar to traditional homemade chocolate, but requires a few adjustments to maintain a smooth, creamy texture.
Step 1: Melt the Base Ingredients
- Gently melt coconut oil, cocoa butter, or a mix of both over low heat.
- Stir in cocoa or cacao powder to create a rich chocolate base.
Step 2: Add the Keto Sweetener
- Use a powdered or liquid sweetener for the smoothest consistency.
- If using granulated sweeteners like erythritol, ensure it’s finely ground before adding.
- Stir continuously to prevent clumping.
Step 3: Customize the Flavor
- Add vanilla extract, cinnamon, or sea salt to enhance the taste.
- Mix in a small amount of nut butter (almond, macadamia, or peanut) for extra creaminess.
Step 4: Pour, Set & Enjoy
- Pour into silicone molds, a tray, or parchment-lined dish.
- Refrigerate or freeze for at least 30 minutes until firm.
4. Flavor Variations & Customization Ideas
💡 Enhance your keto chocolate with these creative variations:
✅ Salted Dark Chocolate – Add sea salt flakes for a rich, salty-sweet combo.
✅ Nutty Keto Chocolate – Mix in crushed almonds, pecans, or walnuts for crunch.
✅ Spicy Mexican Chocolate – Add a pinch of cayenne pepper and cinnamon.
✅ Coconut Almond Bark – Sprinkle shredded coconut and sliced almonds before setting.
✅ Mint Chocolate Delight – Stir in peppermint extract for a refreshing twist.
5. Storage Tips for Keto Chocolate
Since keto chocolate uses natural oils and sugar substitutes, it may have a softer texture compared to store-bought chocolate. Here’s how to store it properly:
✔️ Refrigerator: Store in an airtight container for up to 2 weeks.
✔️ Freezer: Keep in a freezer-safe bag for up to 3 months.
✔️ Room Temperature: If using cocoa butter instead of coconut oil, keto chocolate can be stored at room temperature in a cool, dry place.
💡 Pro Tip: Keto chocolate made with coconut oil tends to melt faster at room temperature, so it’s best stored in the fridge or freezer.
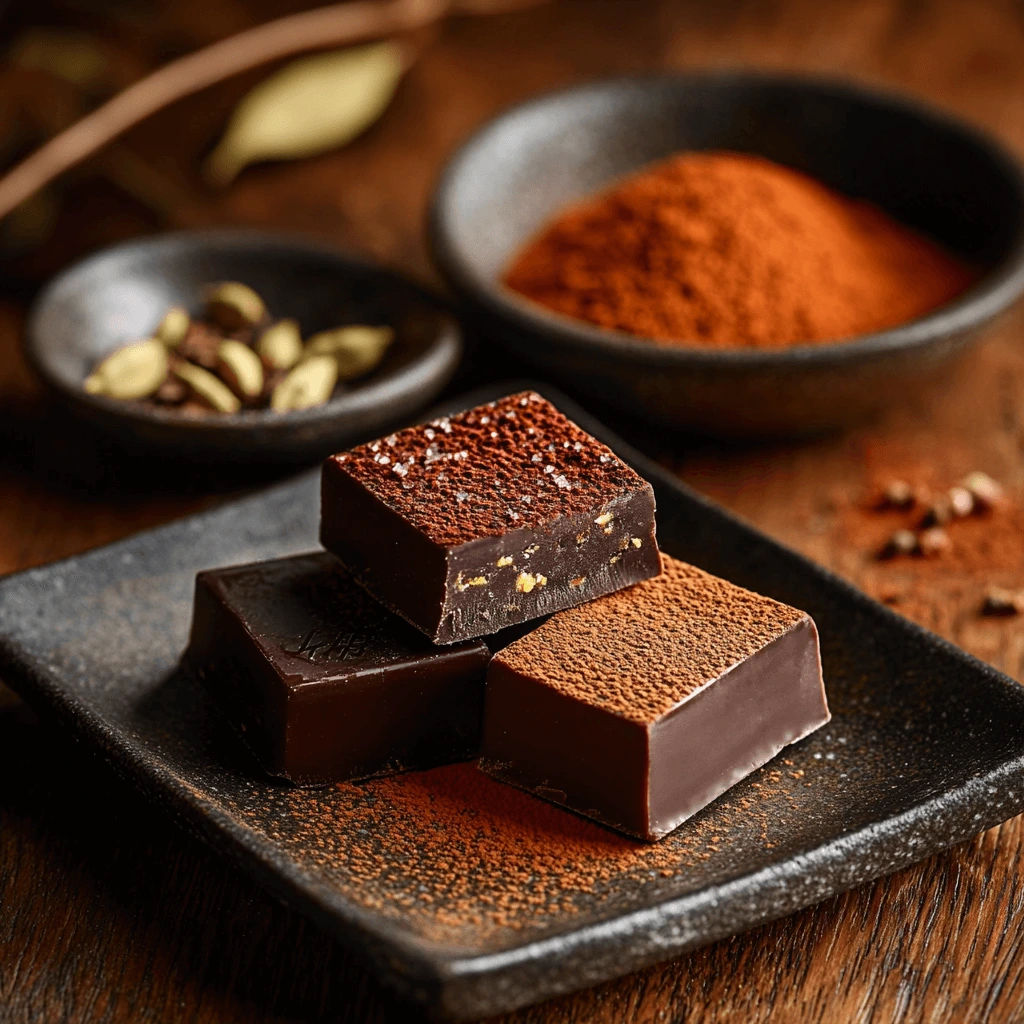
Spiced Chocolate: Add Cinnamon, Cayenne, or Cardamom for a Twist
If you love classic chocolate but want to elevate its flavor, adding spices is a simple yet powerful way to create a unique and gourmet experience. Spices not only enhance the taste of chocolate but also offer health benefits and add a warm, aromatic depth to your homemade vegan chocolate. Whether you prefer warm and cozy, bold and spicy, or exotic and fragrant, there’s a perfect spice combination for you.
In this section, we’ll explore:
✔️ Why spices pair well with chocolate
✔️ Best spices to use and their benefits
✔️ How to balance flavors for the perfect spiced chocolate
✔️ Creative spiced chocolate variations
1. Why Add Spices to Chocolate?
Chocolate has a naturally rich, deep, and slightly bitter profile that pairs well with a variety of spices. Here’s why adding spices is a great idea:
✅ Enhances Flavor Complexity – Spices create depth and contrast, making your chocolate more dynamic.
✅ Boosts Antioxidants – Many spices, like cinnamon and cayenne, are packed with antioxidants.
✅ Supports Digestion & Metabolism – Spices like ginger, cayenne, and cardamom help with digestion and can even boost metabolism.
✅ Adds a Gourmet Touch – Spiced chocolate feels artisanal and luxurious, perfect for gifting or personal indulgence.
💡 Pro Tip: Start with a small amount of spice and gradually increase to suit your taste.
2. Best Spices to Use & Their Benefits
Not all spices work well with chocolate, but these are some of the best options for creating flavorful spiced chocolate:
✔️ Cinnamon – Warm & Comforting
- Adds a natural sweetness and warmth.
- Balances chocolate’s bitterness for a smooth, comforting flavor.
- Pairs well with dark, milk, and white chocolate.
📝 Best For: Classic spiced chocolate, winter treats, or holiday-inspired flavors.
✔️ Cayenne Pepper – Spicy & Bold
- Adds a mild to intense heat, depending on how much you use.
- Creates a Mexican-style hot chocolate effect.
- Enhances circulation and metabolism.
📝 Best For: Those who love bold, spicy flavors or want a warming kick.
💡 Pro Tip: A tiny pinch of cayenne is enough—it’s strong!
✔️ Cardamom – Exotic & Floral
- Offers a slightly citrusy, minty, and floral taste.
- Common in Middle Eastern and Indian desserts.
- Complements dark chocolate beautifully.
📝 Best For: Elegant and sophisticated chocolate flavors.
✔️ Ginger – Sweet & Spicy
- Provides a zesty, slightly peppery kick.
- Adds a warming sensation similar to cayenne but milder.
- Perfect for winter treats and holiday chocolate.
📝 Best For: Pairing with cinnamon and nutmeg for a festive spiced chocolate.
✔️ Nutmeg – Rich & Earthy
- Has a nutty, slightly sweet, and woody flavor.
- Works well with cinnamon and vanilla.
- Adds a cozy and holiday-like aroma.
📝 Best For: Holiday spiced chocolate or fall-inspired flavors.
3. How to Balance Spices in Chocolate
To ensure the perfect balance of flavors, follow these simple guidelines:
✔️ Use a small amount – Spices can be intense, so start with ¼ teaspoon per batch and adjust as needed.
✔️ Pair with sweeteners – If adding bold spices like cayenne or ginger, balance them with a touch of maple syrup or coconut sugar.
✔️ Mix spices into melted chocolate – This helps evenly distribute the flavors.
✔️ Experiment with combinations – Try blending cinnamon + cayenne for a Mexican-style chocolate or cardamom + nutmeg for a chai-inspired version.
💡 Pro Tip: Always taste-test before chilling your chocolate! If a spice tastes too strong, you can adjust before it sets.
4. Spiced Chocolate Variations & Recipe Ideas
Here are a few delicious spiced chocolate variations you can try:
🔥 Mexican-Style Spiced Chocolate
✔️ Dark chocolate base
✔️ ½ tsp cinnamon
✔️ A pinch of cayenne pepper
✔️ A drop of vanilla extract
✔️ Optional: A pinch of sea salt for contrast
💡 Tastes like: A spicy, rich, and slightly sweet chocolate with a bold kick.
🌿 Chai-Spiced Chocolate
✔️ Dark or milk chocolate base
✔️ ¼ tsp cardamom
✔️ ¼ tsp cinnamon
✔️ A pinch of nutmeg
✔️ A tiny pinch of ground ginger
💡 Tastes like: A warming, aromatic chocolate reminiscent of chai tea.
🍂 Cozy Autumn Spiced Chocolate
✔️ Milk chocolate or white chocolate base
✔️ ½ tsp cinnamon
✔️ ¼ tsp nutmeg
✔️ A drop of vanilla extract
✔️ Optional: A pinch of ground cloves
💡 Tastes like: A smooth, comforting chocolate perfect for fall.
5. Storage & Serving Tips for Spiced Chocolate
Since spices continue to release their flavors over time, here’s how to store and serve spiced chocolate for the best taste:
✔️ Let flavors meld – After mixing the spices into melted chocolate, let it sit for 5 minutes before pouring into molds.
✔️ Refrigerate or freeze – Store in an airtight container to keep flavors fresh.
✔️ Pair with drinks – Spiced chocolate tastes amazing with tea, coffee, or dairy-free lattes.
✔️ Gift idea – Wrap spiced chocolate bars in parchment paper and tie with twine for a homemade gift!

Conclusion: Create Your Own Perfect Vegan Chocolate Recipe!
Making your own vegan chocolate at home is not only easy but also incredibly rewarding. By selecting natural, plant-based ingredients, you have full control over the quality, flavor, and nutritional benefits of your chocolate. Whether you prefer a sugar-free, high-protein, or spiced variation, the possibilities are endless to customize your perfect chocolate treat.
Why not start experimenting today? Try one of these variations and share your creation! What’s your favorite combination? Let us know in the comments or tag us on social media using #MyVeganChocolate. 🍫✨